About Us
Search this blog!

OK so it looks like I haven't been crafting .... which I haven't really (spending time with the family and enjoying the Holiday and the gifts we got for Christmas).
But today I spent 6 hours cleaning and organizing my craft room .... AHHHH .... feels sooo good!
I really needed to get stuff put away and cleaned out ... I feel soo much better and I am ready to start crafting again!!!
Be back soon!
Easy Peasy!
I needed one more Christmas card that was easy to whip up to complete out my Christmas card list!
For this one I took paper from the Dollar Store (it was Making Memories and I was a great deal!!!) and made this. I punched a circle and then punched a Reindeer head. I added a gem to his nose and colored it red with my copics and then added a quick and easy sentiment from the Thinking of You set.
Viola .. quick and easy!
ENJOY!
Who Doesn't like chocolate ... especially CUTE chocolate.
I took Hershey nuggets and stamped address labels with a snowflake from the TAC retired set Bunches of Flakes and wrapped them around. The bags are from Michaels/Hobby Lobby ... they are pretzel bags and can be found in the candy making/cake decorating aisle. They fit nuggets perfectly!!!
The topper is a 2 1/2" x 5" piece of cardstock folded in half. I used the snowman from another TAC retired set (this is my favorite snowman!! ... it's so simple and easy to color) called Spirit of Christmas. I colored him with copics and paper-pieced him onto the blue cardstock. I tore white cardstock for snow. I used Thinking of You for the Sentiment and then Winter Tags on the back for the To:/From:
I had to make 80 of these guys for all of the co-workers that help me every day get the job done! They were quite easy to do once I got the design down and did them in an assembly line fashion! Thanks Kim for convincing me to keep it simple!! You are a life-saver!
ENJOY!
Another One???!!!!
I know you have seen a few of these cards ... just like this ... but this shows how versatile and easy making one card for multiple occasions can be!!
For this one I took the Bitty Dots GWP and stamped it with Versamark and embossed with Silver embossing powder. I then sponged the edges of the squares (after punching) with silver ink. I used the Fabulous Frames with the Labels One Nestability again and then used the sentiment from Thinking of You.
I just totally LOVE this look and the silver embossed is very elegant and classy. In fact this was my card to my niece who got married this weekend ... Congrats Sarah and Cory!
ENJOY!
Thank You!
For this card I modified a card that I made ot my Holiday open house (HERE) and turned it into a Thank You card.
I took the Bitty Dots GWP and stamped them with Reflection Blue and Chartreuse Palette inks. I then punched them with my square punch. The edges of the squares were then sponged with those same colors.
I stamped the Thank You Oval PWP on white cardstock and die cut it out with the Labels 5 Nestability. I then sponged the edges of that piece as well.
I pop-dotted the label in the middle to add dimension and viola ... quick, cute, and fast cards in a pinch ... using stamps that you can get for FREE!!! What could be bettter???!!!!
ENJOY! and please visit the following blogs for more ideas with what you can do with those GWPs and PWPs.
Shirley: http://glitteredpaws.blogspot.com/
Christine: http://christines-creativetherapy.blogspot.com/
Tina: http://card-i-ology.blogspot.com/
Betty: http://stampinteacher.blogspot.com/
Laurie U.: http://laurieunger.blogspot.com/
Angela: http://www.angelakelley.blogspot.com/
Carol: http://stampincarol.blogspot.com/
Seleise http://www.amethystcat.blogspot.com/
Since I am the card maker in the office I am always being asked to make cards ... which don't get me wrong ... I do not mind!!!
I modified one of the ones from my open house and added a few more touches to it and Viola ... cards for the admins!
I used the snowman from Jingle Jolly and the sentiment from Cuddly Christmas. I colored him with my copics and pop-dotted him. I added the large Sizzix snowflake and the Sizzix embossed background. I added ribbon and a button.
ENJOY!
Chilly!
To start this project I brayered Reflection Blue Palette ink and Beaux Arts Blue Paette ink onto my glossy cardstock.
After I got it to the color and blend that I wanted, I stamped some snow flakes from Vintage Santa stamp set and embossed them in with white embossing powder.
I then stamped the duck from Cuddly Christmas on another piece of cardstock and colored him with my copics. I matted him on black and added the ribbon. I then stamped the sentiment also from the Cuddly Christmas set and matted it on black too with fun foam to pop-it up. I adhered everything to a black mat.
ENJOY! Pull out your brayer and join us!!!
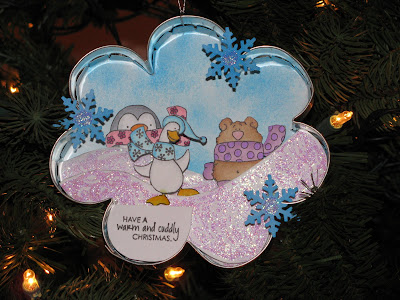
Cuddly Scene Ornament
My BFF (Kim) and I were involved in an ornament swap over on the Stamp Shack. This is the ornament that I made for her.
The picture (although good) does not really do this project justice.
I took a cookie cutter (yes a real cookie cutter - it's about 4" x 3" - got it at Hobby Lobby for 99 cents) ... and made a scene IN the cookie cutter. I think it's a cookie cutter of a cloud ... (or a flower?)
I used Kim and my favorite TAC set right now ... Cuddly Christmas.
I stamped the guys on white cardstock, colored them with my copics, and cut them out ....then the fun began!
I traced around the inside of the cookie cutter and then added 1/4" of extra that then was tucked into the cookie cutter to hold the backing on. I sponged this piece with Reflection Blue Palette ink for a sky effect.
I then traced some random snow hills in the cookie cutter and adhered those with layers of fun foam to give the ornament depth ... there is a total of 4 layers in this project. I added Crystal Stickles all over the snow hills (it's not really pink just photographed that way). I layered the cuddly creatures within these layers.
Then I stamped the sentiment and made it fit in another section of the cookie cutter.
I punched some snowflakes with my Martha Stewart and added stickles to the middle of these and then used glue dots to adhere those to the top of the cookie cutter.
I added a string to the be able to hang it on the tree ... and viola!
Here it is closer up!
Here is a side view of the ornament showing all of the layers.
ENJOY!
hmmmm ..... I love this project so much that maybe Kim isn't going to be getting it ... LOL!!!!
Tree in the Window
I have been wanting to use this window stamp set for a long time but wanted to creat my own scene with other stamps ... then it hit me!
I used the window from Window Box Wonder and made a square hole in the card. I only glued down the frame and left the shutters so that they could pop off the page. I added a snowhill that I cut and added Martha Stewart snow glitter to.
Inside
The inside of the card has a tree from Fibi & Lili Christmas and the sentiment is also from that set. I colored it with my copics.
ENJOY!
From now through December 31st TAC is offering TRIPLE rewards on all Hostess sets and GWPS!!! 3x the fun!!! Happy Holidays to all of our customers!!! Email or call me if you need to place an order and get on this specTACular deal!!!
At this time of the year we are all thankful for someone! TAC has a great sentiment set on special this month to show the ones you are thankful for how much you mean it.
www.theangelcompany.net
Total Pageviews
Blog Archive
-
►
2018
(72)
- December (9)
- November (4)
- October (7)
- September (5)
- July (17)
- June (3)
- May (4)
- April (10)
- March (4)
- February (5)
- January (4)
-
►
2017
(108)
- December (16)
- November (8)
- October (8)
- September (8)
- August (12)
- July (4)
- June (4)
- May (8)
- April (13)
- March (8)
- February (12)
- January (7)
-
►
2016
(140)
- December (22)
- November (7)
- October (11)
- September (5)
- August (14)
- July (8)
- June (8)
- May (19)
- April (4)
- March (11)
- February (9)
- January (22)
-
►
2015
(153)
- December (14)
- November (1)
- October (6)
- September (17)
- August (16)
- July (1)
- June (16)
- May (12)
- April (11)
- March (12)
- February (24)
- January (23)
-
►
2014
(164)
- December (19)
- November (12)
- October (14)
- September (15)
- August (12)
- July (4)
- June (17)
- May (16)
- April (9)
- March (11)
- February (19)
- January (16)
-
►
2013
(198)
- December (23)
- November (12)
- October (21)
- September (15)
- August (15)
- July (16)
- June (13)
- May (17)
- April (13)
- March (15)
- February (19)
- January (19)
-
►
2012
(179)
- December (26)
- November (14)
- October (17)
- September (13)
- August (13)
- July (11)
- June (7)
- May (22)
- April (15)
- March (10)
- February (20)
- January (11)
-
►
2011
(164)
- December (16)
- November (9)
- October (9)
- September (6)
- August (14)
- July (11)
- June (16)
- May (9)
- April (17)
- March (19)
- February (25)
- January (13)
-
▼
2010
(196)
- December (11)
- November (21)
- October (13)
- September (20)
- August (18)
- July (15)
- June (25)
- May (18)
- April (13)
- March (7)
- February (5)
- January (30)
-
►
2009
(157)
- December (18)
- November (9)
- October (13)
- September (9)
- August (16)
- July (8)
- June (12)
- May (15)
- April (8)
- March (15)
- February (15)
- January (19)


