About Us
Search this blog!

Powered by Blogger.
Sunday, March 14, 2010
8:00 PM
Blog Hop - Easter Candy Gifts!
Welcome to this month's Blog Hop sponsored by Paper Wings!
Paper Wings is a great community site devoted to The Angel Company.
I decided to make an Easter Candy Gift Holder and give you the full details on how to make this cute and fast item. I think you'll agree that these are so simple, cost effective, and you can whip them up really fast.
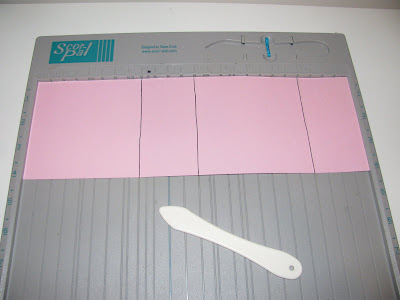
1. You start by cutting a piece of cardstock to 4" x 12" (you can make 3 of these from one 12" x 12" sheet of cardstock). The heavier the cardstock the better.
2. Then you score it at 4", 6", and 10" using your ScorPal ... see above (I made pen lines to demonstrate where scores are ... so you can see)
3. Then make a 3" circle in the panel shown above. I used a circle Nestability.
4. Then take the Corner Chomper and 1/2" corner round each corner ... fold on scores and punch through both layers. The Corner Chomper works great for this project ... it goes through chipboard or multiple layers with ease!
Here is what it looks like after you've corner rounded.
5. Then cut a piece of transparency or acetate to 3 1/4" x 3 1/4" and attach it to cover the circle opening.
6. Using a 1" circle punch, punch a half circle in the top and across the bottom edge.
Here is what it looks like after you've punched the half circles.
7. Then it's time to decorate. I used the bunny and sentiment from the Hoppity Skippity set. I colored the bunny with my copic markers.
8. Finally fill it with your favorite treat (I used Reese's Peanut Butter Eggs). I use candy/treat bags that you can find at your local craft store in the candy/cake decorating aisle. They are about 4" x 10" long. I then tied it with pretty ribbon (I used Toodle Loo ribbon by TAC) and trimmed the excess bag.
ENJOY!!!
Please visit these other blogs to see more Easter Themed treats/cards:
Subscribe to:
Post Comments
(Atom)
Total Pageviews
Blog Archive
-
►
2018
(72)
- December (9)
- November (4)
- October (7)
- September (5)
- July (17)
- June (3)
- May (4)
- April (10)
- March (4)
- February (5)
- January (4)
-
►
2017
(108)
- December (16)
- November (8)
- October (8)
- September (8)
- August (12)
- July (4)
- June (4)
- May (8)
- April (13)
- March (8)
- February (12)
- January (7)
-
►
2016
(140)
- December (22)
- November (7)
- October (11)
- September (5)
- August (14)
- July (8)
- June (8)
- May (19)
- April (4)
- March (11)
- February (9)
- January (22)
-
►
2015
(153)
- December (14)
- November (1)
- October (6)
- September (17)
- August (16)
- July (1)
- June (16)
- May (12)
- April (11)
- March (12)
- February (24)
- January (23)
-
►
2014
(164)
- December (19)
- November (12)
- October (14)
- September (15)
- August (12)
- July (4)
- June (17)
- May (16)
- April (9)
- March (11)
- February (19)
- January (16)
-
►
2013
(198)
- December (23)
- November (12)
- October (21)
- September (15)
- August (15)
- July (16)
- June (13)
- May (17)
- April (13)
- March (15)
- February (19)
- January (19)
-
►
2012
(179)
- December (26)
- November (14)
- October (17)
- September (13)
- August (13)
- July (11)
- June (7)
- May (22)
- April (15)
- March (10)
- February (20)
- January (11)
-
►
2011
(164)
- December (16)
- November (9)
- October (9)
- September (6)
- August (14)
- July (11)
- June (16)
- May (9)
- April (17)
- March (19)
- February (25)
- January (13)
-
▼
2010
(196)
- December (11)
- November (21)
- October (13)
- September (20)
- August (18)
- July (15)
- June (25)
- May (18)
- April (13)
- March (7)
- February (5)
- January (30)
-
►
2009
(157)
- December (18)
- November (9)
- October (13)
- September (9)
- August (16)
- July (8)
- June (12)
- May (15)
- April (8)
- March (15)
- February (15)
- January (19)

Copyright
Copyright 2021
InkyStamper LLC
All Rights Reserved


19 comments:
Great project! TFS all the instructions!
How cute! And a tutorial too! Thanks sooo much, I will be trying it out!
Great tutorial! I'm going to have to make this "sweet" candy container! thks for joining the blog hop. rita w
That's so cool! Thanks for the tutorial. I'll have to make one for my 7 year old.
Oh this is wonderful! Thanks so much for the tutorial - now I'll have to try that. Seems like it would make a great gift for the kids in Abby's class.
What a great idea, and sharing the tuitorial is even better. I will be playing with this idea soon.
omg girl love the tutorial - wish it wasn't so late or I would go try it now. These are really really cute - thanks for sharing with us.
what a super cute project and thanks so much for the tutorial! you did a fabulous job and the idea is great!
adorable project! Definatly have to print out this one!!!!!
Adorable! Great tutorial too, thanks for sharing :)
Adorable project, Chelsea! And love the step-by-step tutorial :)
Thank you for such great instructions! Very cute project!! TFS!
What a darling little project. I love that little bunny!
Just Adorable Chelsea!TFS the instructions too!
Great treat holder and great tutorial, too!!
WOWZERS what a great tutorial! I love these treat holders! Quick and cute! They can hold a lot of different things!! LOVE IT! You ROCK!
great project and tutorial!! You do awesome work. Thanks for sharing and blessings
Very fun and thanks for the tutorial.
Dang this is cute girl!!! You rock as always!