About Us
Search this blog!

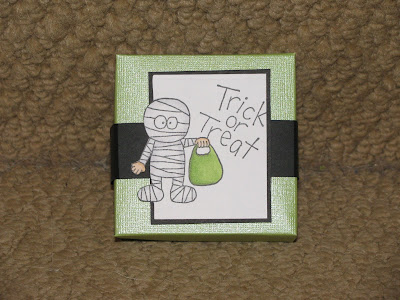
Wicked Treat Holder
For today's project I used the TAC stamp set called Trick or Treaters. This stamp set has been around for a couple of years and as most of my friends and blog followers know, it is my favorite Halloween set!!!
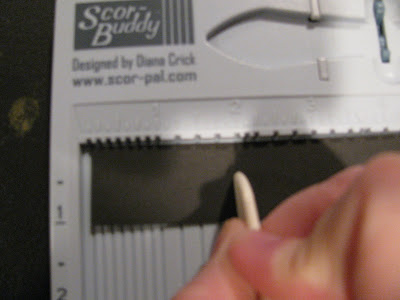
For this project, I also will use my new and favorite tool the Scor-Buddy and will color the image with copic markers.
To start find your favorite cardstock and cut a 12" x 12" into 6" x 6" squares (note: one sheet of cardstock will make 2 boxes).
Score the square at 1 1/2" and turn 90 degrees. Score again and turn. Score again and turn. Score again and turn.
Your piece will then look like this ....
Cut the bottom scores and the top scores to the middle square.
Fold the sides up and adhere.
This is what you will end up with and this is the bottom of your box.
Now take another one of your 6" x 6" squares ......
This time START the cardstock on the 1/8" mark (do not make flush with the left side or the scor-buddy)
Score again on the 1 1/2" mark all the way around and cut on the score lines and adhere together ... just as above ... although again always start on the 1/8" line with this 6" x 6" piece.
This is now the top of your box and since you started on the 1/8" line it makes the top wider than the bottom and thus fits over the bottom.
Now that you have your box parts made ... now it's time to make your band that goes around the box. Cut a 1" x 10" strip of a coordinating cardstock.
Score this band piece at 1 7/8", 3 1/2", 6 3/4", and 8 3/8". Wrap this around the box and adhere the ends together.
Next cut a piece of white cardstock 2" x 2 1/2". This is where you will stamp your imag e and you will mat that on a piece of cardstock 2 1/4" x 2 3/4"" to match your band.
Adhere this panel to the band.
These are all of the final pieces of the project.
I hope you enjoyed this project. It is a great project for your Scor-buddy or Scor-pal!
You can modify this project for Christmas or birthdays or whatever special occasion you might have!
It's a great gift just by itself ... but of course you SHOULD put something in it!!!
Now do you want to see more Wicked Cool Creations????
Please hop on over to the The Angel Company's blog site HERE and blog hop with us today.
Thanks for stopping by and ENJOY!
Total Pageviews
Blog Archive
-
►
2018
(72)
- December (9)
- November (4)
- October (7)
- September (5)
- July (17)
- June (3)
- May (4)
- April (10)
- March (4)
- February (5)
- January (4)
-
►
2017
(108)
- December (16)
- November (8)
- October (8)
- September (8)
- August (12)
- July (4)
- June (4)
- May (8)
- April (13)
- March (8)
- February (12)
- January (7)
-
►
2016
(140)
- December (22)
- November (7)
- October (11)
- September (5)
- August (14)
- July (8)
- June (8)
- May (19)
- April (4)
- March (11)
- February (9)
- January (22)
-
►
2015
(153)
- December (14)
- November (1)
- October (6)
- September (17)
- August (16)
- July (1)
- June (16)
- May (12)
- April (11)
- March (12)
- February (24)
- January (23)
-
►
2014
(164)
- December (19)
- November (12)
- October (14)
- September (15)
- August (12)
- July (4)
- June (17)
- May (16)
- April (9)
- March (11)
- February (19)
- January (16)
-
►
2013
(198)
- December (23)
- November (12)
- October (21)
- September (15)
- August (15)
- July (16)
- June (13)
- May (17)
- April (13)
- March (15)
- February (19)
- January (19)
-
►
2012
(179)
- December (26)
- November (14)
- October (17)
- September (13)
- August (13)
- July (11)
- June (7)
- May (22)
- April (15)
- March (10)
- February (20)
- January (11)
-
►
2011
(164)
- December (16)
- November (9)
- October (9)
- September (6)
- August (14)
- July (11)
- June (16)
- May (9)
- April (17)
- March (19)
- February (25)
- January (13)
-
▼
2010
(196)
- December (11)
- November (21)
- October (13)
- September (20)
- August (18)
- July (15)
- June (25)
- May (18)
- April (13)
- March (7)
- February (5)
- January (30)
-
►
2009
(157)
- December (18)
- November (9)
- October (13)
- September (9)
- August (16)
- July (8)
- June (12)
- May (15)
- April (8)
- March (15)
- February (15)
- January (19)


21 comments:
OMG OMG OMG this is so stinking adorable! Awesome Tutorial on how to make one of those FABULOUS boxes! LOVE THIS!
This is way cute and what a wonderful tutorial!
Very cute - who doesn't love little treat boxes?!? :)
Love it! I am so making this box! This is one of my favorite Halloween sets to but I made myself NOT use it! Torture! Only because it's all I used last year! LOL! Love your project!
pvery nice treat box. Can I trick or treat at your house?
So cute! Super fun and easy - I bet I can recruit some helpers!
Great and easy tutorial! Your box will certainly be a delight for someone!
Cute box. Thanks for sharing the "how to".
Great box for a special Halloween treat!
this is so cute, Chelsea! Thanks for sharing the instructions!
I really love this box, and to give us the instructions too is way great. I also love your blog header, very pretty.
Very cute and thanks for the instructions too!
Great treat box and tutorial
OMG, I so love that little mummy guy! So cute on the box. GREAT project idea--thank you for the step-by-step photos! :}
Wow, I love this box!
Great little box! thanks for the tutorial too!
Great project! TFS I love that set too,one of my favorites!!
This is darling - great job on the tutorial too. Love this set too. Was out of townb - sure hate I missed this bloghop but will be in on the next one.
oh - how FUN!
tee hee...I hope that on the next one, someone gives me instructions, as I totally botched this one!!! Love your project, Chelsea! That box is such a perfect size! Thanks for sharing your adorable Halloween treat box!
Super cute! Thanks for the great tutorial... this box is the perfect size for a spooky good treat!