About Us
Search this blog!

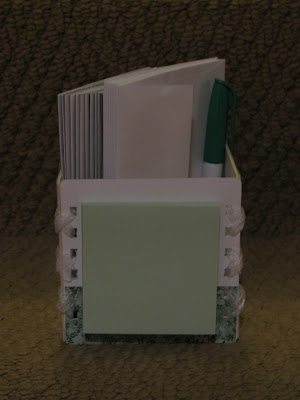
It's that time of the year ... last day of school! Yesterday was Chase's last day. I made his teacher one of those great cubes with thank you notes. When I picked Chase up yesterday she said thanks sooo much a gift that I can actually use! I am so glad ... love when my handmade gifts make others so happy!
Desk Cube with Thank you Notes
Main Panel
Picture Panel
Notes Panel
Has transparency on it - can write memos on it with Dry Erase marker and wipe them off.
Post-It Panel
Personalized Thank Yous with Matching Envelopes
I typed the "From the desk of Mrs. Ackerman" in Microsoft Word and used the WordArt feature to make the text in an arc. I punched them out with my circle punch and them stamp the butterfly on them with the Oh How set from TAC I mounted that on a scallop circle. I also stamped the front of each envelope with the same butterfly. (the same butterfly is also on the main panel of the cube).
The box is made of 4x4 coasters. They were covered with patterned paper and decorated. Once you have finished decorating you use the Bind-It-All to punch holes in the sides of each coaster. Ribbon is then used to tie/lace the sides together. Once that is complete you can glue the bottom to the cube using a strong liquid glue.
Thanks to everyone that came by over the past few days to view the Cards for Heroes Blog Hop. I had more than 90 comments on my posts and even more visitors than that to my site.
Here is another card that I was inspired by to make for the occaision. It is a great image and sentiment by Greeting Farm called Hero.
I colored him with my Copics and he is pop-dotted on the front.
Hope you have a great Memorial Day!
Cards for Heroes is a wonderful organization!
The mission of this group is to support our nation’s armed forces by sending blank greeting cards to write home on, as well as cards of gratitude to encourage them.
What a great group for all of us papercrafters to support!
Almost everyone in the country is touched by someone they know who is shipped off overseas to serve this wonderful country.
My Hero is my brother-in-law Kevin Twyeffort. This is Kevin's 2nd time serving overseas. I think of him often and pray that he will soon return home to Stephanie, Sarah, Hannah, and Caleb! (He actually is on a 2 week leave right now!)
Kevin Twyeffort
Here is my card ... Thanks Kevin for making a difference!!!
I stamped the outside with The Angel Company's patriotic star from the For All Seasons set. I then colored it with my Copic markers. I then stamped a circle from the All Occasion Circle set and colored in some of the circles. I punched out the circle with my punch and then mounted it on a red scalloped circle. I used the sentiment from the Ordinary Greeting set. I added a blue ribbon and viola! My patriotic card.
Here is the inside of my card.
Thanks again Kevin for everything that you do for me, your family, and your country! You really do make a difference to all of us!
To continue on our blog hop adventure,
please jump on over to Tereza's blog:
http://creatingtreasures.blogspot.com/
I love shopping for stamps and scrapbook supplies at garage sales. Last week I must say I hit the jackpot. I went to this garage sale where the previous owner of the house left a bunch of stuff in the house ... including her stamps!!! How could she do that? Well anyway I scored .... any stamp ... any size ... for get this ....$1!!! I got some really really great stamps! One of them was this tree below.
Owl in a Tree
I wanted to put something in the tree so I chose this owl from the Bird Cage set. I colored the tree and the owl with my copics ... I love the shading that I did!!! I then added the sentiment from What a Hoot to the bottom and added some ribbon.
I am officially addicted to Copics!
I had to make some animal ATCs for some swaps over at the Stamp Shack recently. One was a cow theme and one was a sheep theme. Here are my creations:
Cow ATC
I used the February TAC Vintage set Sealed with a Kiss for this one. I love that set!!! The sentiment is from the Udder Birthday set. I stamped the image with Palette Noir and stamped the head twice. I colored his flowers with colored pencils and OMS. I pop-dotted his head. I then triple matted it with pink and black.
Sheep ATC
I used the Edge Designs and Hoppity Skippity sets for this one. I stamped the image with Palette Noir and then masked it and sponged green all around to represent the grass. I then applied white fun flock to the sheep. Stamped the edge and the image and matted on black.
Close up
(sorry for the blurry photo)
Enjoy!
I am going to participate in the bloghop cards for heroes later this week. I am putting my final touches on my card and posting.
Interested in this group or the blog hop? Check out the site HERE for more details.
So today I wanted to try coloring some more of my images with my Copics and the techniques that I learned yesterday. I saw the TAC Vintage set of the Month (Everyday Mice) and thought ... PERFECT to color!
Once I was done, all I did was just mount all of these on a solid cardstock. They can be used to add to last minute cards when I get in a pinch for time.
If you love this set as much as I do ... act fast ... at the end fo this month this set will be sent back to the TAC vault (kind of like Disney!). It is just $16.50 (no other purchase required).
Happy Birthday!
I colored the girl and bird from the TAC set Everything is Blooming with my new Copics (you can see most ofthe shading and blending in her dress). I cut the image out with my nestabilities. To get that white border, I kept the image in the rectangle nestability die and then sponged blue ink all around the edges. I then cut out a green scalloped rectangle to mat it on. Stamped "Happy Birthday" with the Ordinary Greetings set and added brads to the bottom right (I colored these with my Copics too - they match!!)
Once you learn the Copic system and some basics on how to color with them ... you too can master them! I am so glad that I took that class today. I have to keep practicing ... and coloring ... oh darn :)
Have you ever made something for someone else and completely fallen in love with it for yourself?? This next item is going to be really hard for me to part with tomorrow.
It's for my work friend Amanda. Tomorrow is her shower at work and after going to her family shower on Saturday ... not sure what else she could ever need, but thank you cards might be in order.
I made 12 note cards that are blank inside. I figured that way she could use them for thank yous or for announcements or for shower gifts for others. I also stamped the image on each envelope. I then made a cute little holder for all of them and a coordinating tag.
The image that I used is from the new TAC set called Special Delivery. I colored it with colored pencils and OMS. I edged the image and sentiment with Brilliance Blue ink that I sponged on. I made the gift bag myself with my ScorPal. I have never made one of these and it was sooo easy. I used eyelets from Mia's Cottage Hardware collection to attach my handle and for the center of the flower. The flowers that I used were from the Hillary and Elizabeth flower collections.
I made a little coordinating tag with the Merchandising Tag punch and stamped to and from with a stamp from the Winter Tags set. I set an eyelet on this tag and then tied it on with some coordinating blue ribbon.
To make these cute little onesie cards you have to make a card base that is 4 1/4" x 5 1/2" and folded at the top. You then use your circle punch to punch out a neck and 2 leg holes. After that you cut a "7" and a backwards "7" from the punched circle to just under where you want the arms to be. To dress it up a bit I punched slightly larger circles out of white cardstock and used that for cuffs and collars. I used the Special Delivery image again put a much smaller portion of it and punched that in a circle as well. It was colored with colored pencils and OMS and edged with Brilliance Blue ink that I sponged on. For an added touch I added 3 tiny buttons to the bottom of the card that I threaded a sliver of the patterned paper through.
For the outside of the envelope I stamped the image again using the Palette Noir ink but left it plain and didn't color it.
It's great to make handmade gifts for friends and loved ones that appreciate them. I know that Amanda will love these ... again they are just sooo cute that it's going to be hard to give them up!
Happy Birthday!
Here is a little card that I whipped up for a friend's birthday. I used this month's TAC Vintage Set called Everyday Mice. I colored the image with colored pencils and Odorless Mineral Spirits. I sponged the edges of the white with black ink to tone it down/distress them a bit. I mounted the image on blue and used the same shade of blue brads on the bottom of the card. I used "Happy Birthday" from the Ordinary Greetings set.
I absolutely love the way it turned out! And of course no baby gift can be given without a baby card .... Here is my card to go with the gift.
Special Delivery
I used the new TAC set called Special Delivery for this card. I colored the image with colored pencils and OMS. I accented with a scallop oval and blue ribbon.
Total Pageviews
Blog Archive
-
►
2018
(72)
- December (9)
- November (4)
- October (7)
- September (5)
- July (17)
- June (3)
- May (4)
- April (10)
- March (4)
- February (5)
- January (4)
-
►
2017
(108)
- December (16)
- November (8)
- October (8)
- September (8)
- August (12)
- July (4)
- June (4)
- May (8)
- April (13)
- March (8)
- February (12)
- January (7)
-
►
2016
(140)
- December (22)
- November (7)
- October (11)
- September (5)
- August (14)
- July (8)
- June (8)
- May (19)
- April (4)
- March (11)
- February (9)
- January (22)
-
►
2015
(153)
- December (14)
- November (1)
- October (6)
- September (17)
- August (16)
- July (1)
- June (16)
- May (12)
- April (11)
- March (12)
- February (24)
- January (23)
-
►
2014
(164)
- December (19)
- November (12)
- October (14)
- September (15)
- August (12)
- July (4)
- June (17)
- May (16)
- April (9)
- March (11)
- February (19)
- January (16)
-
►
2013
(198)
- December (23)
- November (12)
- October (21)
- September (15)
- August (15)
- July (16)
- June (13)
- May (17)
- April (13)
- March (15)
- February (19)
- January (19)
-
►
2012
(179)
- December (26)
- November (14)
- October (17)
- September (13)
- August (13)
- July (11)
- June (7)
- May (22)
- April (15)
- March (10)
- February (20)
- January (11)
-
►
2011
(164)
- December (16)
- November (9)
- October (9)
- September (6)
- August (14)
- July (11)
- June (16)
- May (9)
- April (17)
- March (19)
- February (25)
- January (13)
-
►
2010
(196)
- December (11)
- November (21)
- October (13)
- September (20)
- August (18)
- July (15)
- June (25)
- May (18)
- April (13)
- March (7)
- February (5)
- January (30)
-
▼
2009
(157)
- December (18)
- November (9)
- October (13)
- September (9)
- August (16)
- July (8)
- June (12)
- May (15)
- April (8)
- March (15)
- February (15)
- January (19)


